Input Sources
Overview
The Input Sources feature is a significant enhancement for Torque users, providing a more dynamic and flexible way to retrieve and manage input values from external data sources. Whether you're dealing with multiple S3 buckets or preparing for future integrations with other external sources, this feature streamlines your workflow and ensures your configurations are always up-to-date.
During the launch environment process, this feature simplifies the handling of multiple data sources by using a single configuration template, and allowing real-time listing of S3 bucket objects.
Key Benefits
- Real-Time Data Access: Retrieve up-to-date values from external sources such as S3 buckets or HTTP servers, ensuring that your configurations are always in sync with the latest data.
- Flexible Source Management: Define and reuse input sources across different blueprints, making it easier to manage and update configurations.
- Enhanced User Experience: Simplifies the process of selecting input values by dynamically generating options based on real-time data from external sources.
Supported External Sources
S3 Buckets
The S3 input source supports listing objects within S3 buckets, such as s3-object and s3-object-contents.
Configuration Fields:
| Field | Description | Allow Overrides |
|---|---|---|
| Credentials | AWS credentials for access | No |
| Bucket Name | Name of the S3 bucket | Yes |
| Source Type | s3-object or s3-object-content | No |
| object_key | (For s3-object-content) Object key to list | Yes |
| json_path | JSONPath for extracting desired values | Yes |
| display_json_path | (Optional) JSONPath for display values | Yes |
| path_prefix | (Optional, s3-object only) Path prefix to filter objects | Yes |
| regex_filter | (Optional) Regex filter to refine results | Yes |
Azure Blob Storage
The Azure input source supports listing blobs within Azure Blob Storage containers, with types azure-blob and azure-blob-contents.
Prerequisites:
Before setting up Azure Blob Storage as an input source, ensure you have the following:
-
An Azure subscription
-
Steps to create and register an application in Azure Active Directory (AD):
- Navigate to "App Registrations" in Azure AD and click New Registration. Follow the prompts (you only need to provide the name of the application). Note the Tenant ID and Application ID as these are required later.
- Go to Certificates & Secrets and create a new client secret. Note the Secret Value for use in the application configuration.
-
Assign the Reader role to the application:
- Navigate to Subscriptions and select the appropriate subscription.
- Under Access Control (IAM), click Role assignments and select Add role assignment.
- In the Roles tab, search for the Storage Blob Data Reader role, and click Next.
- On the Members tab, select User, group, or service principal and search for the registered application.
- Click Select, then Review and Assign to complete the setup.
Configuration Fields:
| Field | Description | Allow Overrides |
|---|---|---|
| Credentials | Azure credentials for access | No |
| Storage Account Name | Name of the Azure Storage Account | Yes |
| Container Name | Name of the Blob Container | Yes |
| Source Type | azure-blob or azure-blob-content | No |
| blob_name | (For azure-blob-content) Blob name to list | Yes |
| json_path | JSONPath for extracting desired values | Yes |
| display_json_path | (Optional) JSONPath for display values | Yes |
| path_prefix | (Optional, azure-blob only) Path prefix to filter blobs | Yes |
| regex_filter | (Optional) Regex filter to refine results | Yes |
HTTP Server
This feature is available in currently in general beta.
The HTTP Server input source is a powerful feature that allows you to connect to your own HTTP server to retrieve dynamic data. This is particularly useful for populating combo boxes on the launch form with values computed by user-defined code running on your server.
Example Architecture Diagram
Below is an example diagram illustrating the architecture for using an HTTP Server as an input source:
Configuration Fields:
| Field | Description | Allow Overrides |
|---|---|---|
| Agent | Agent to proxy all calls through | No |
| Authority | URL of your HTTP server (protocol & hostname) | No |
| Path | (Optional) API path of your HTTP server | No |
| Query | (Optional) Query string for your HTTP server | No |
| Headers Dictionary | (Optional) Custom headers | No |
| Skip SSL Verification | Skip SSL certificate verification | No |
| Timeout | Maximal timeout for the HTTP server | No |
| json_path | JSONPath for extracting desired values | Yes |
| display_json_path | (Optional) JSONPath for display values | Yes |
| regex_filter | (Optional) Regex filter to refine results | Yes |
How It Works
Creating an Input Source
Torque role: Account admin
Modifying or deleting an Input Source may cause blueprints that use the Input Source to fail.
General Steps
- Navigate to Input Sources: Select All Spaces in the space selection dropdown, go to Automation > Credentials, and open the Input Sources tab of the Integrations page.
- Add New Source: Click Add Input Source to open the three-step wizard (Select a New Input Source, Details, Setup).
- Select preferred provider: Choose S3 Bucket, Azure Blob, or HTTP Server and click Next.
- Details: Enter a Source Name, optionally a Description, and set Shared Spaces - keep Share with all spaces on, or turn it off and choose the spaces whose blueprints may use this source. Click Next.
- Setup: Fill in the provider-specific fields described below, use Preview Results to check the values the source returns, and click Done.
S3 Input Source
In the Setup step of the wizard (or the Setup tab when editing an existing source), fill in:
-
Input Source Setup:
- Credentials - select the saved AWS credentials that can read the bucket
- bucket_name - the bucket where you keep your source files
- S3 Bucket Source Type -
S3 Object(list the objects in the bucket) orS3 Object Content(read values from inside one object)
-
Source Type Parameters:
- object_key (
S3 Object Contentonly) - File Format -
JSON - json_path (
S3 Object Contentonly) - display_json_path (optional,
S3 Object Contentonly)
- object_key (
-
Advanced S3 Bucket Filters:
- path_prefix (optional,
S3 Objectonly) - regex_filter (optional)
- path_prefix (optional,
-
Preview and finish: Click Preview Results in the Live Results panel to verify that your setup retrieves the correct values, then click Done (or Save when editing).
Azure Blob Storage Input Source
-
Input Source Setup:
- Credentials - select the saved Azure credentials that can read the storage account
- storage_account_name
- container_name
- Azure Blob Source Type -
Azure Blob(list the blobs in the container) orAzure Blob Content(read values from inside one blob)
-
Source Type Parameters:
- blob_name (
Azure Blob Contentonly) - File Format -
JSON - json_path (
Azure Blob Contentonly) - display_json_path (optional,
Azure Blob Contentonly)
- blob_name (
-
Advanced Azure Blob Filters:
- path_prefix (optional,
Azure Blobonly) - regex_filter (optional)
- path_prefix (optional,
-
Preview and finish: Click Preview Results in the Live Results panel to verify that your setup retrieves the correct values, then click Done (or Save when editing).
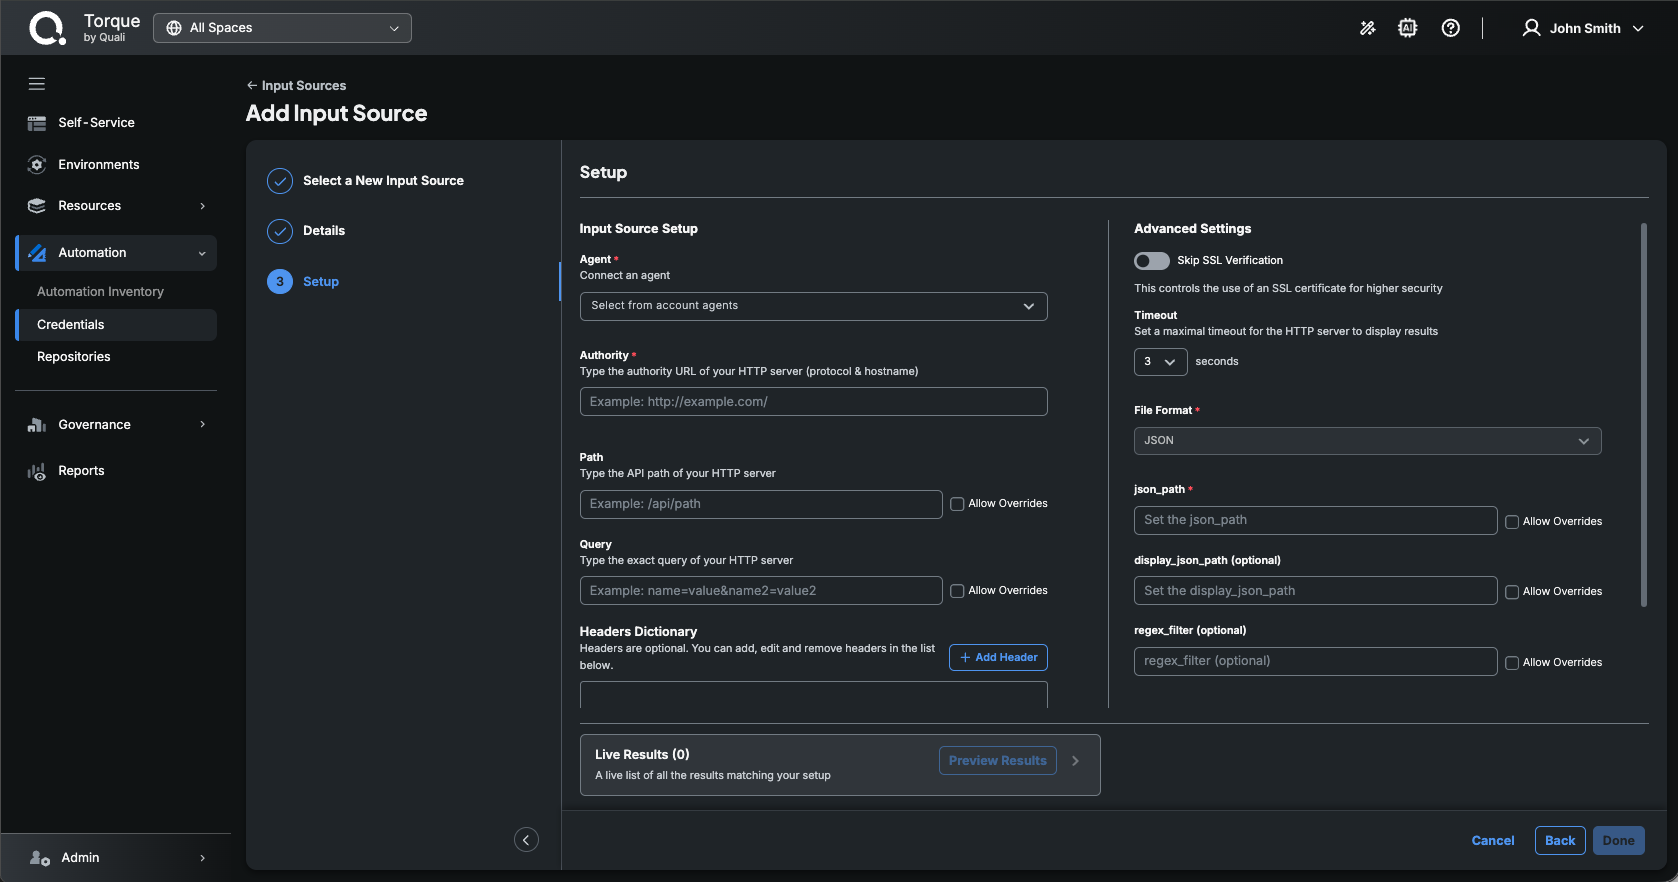
HTTP Server Input Source
-
Input Source Setup:
- Agent - the account agent that proxies the calls to your HTTP server
-
HTTP Server URL Setup:
- Authority - the protocol and hostname of your HTTP server, for example
http://example.com/ - Path (optional) - the API path, for example
/api/path - Query (optional) - the exact query string, for example
name=value&name2=value2 - Headers Dictionary (optional) - click Add Header to add Header Name / Header Value pairs
- Authority - the protocol and hostname of your HTTP server, for example
-
Advanced Settings:
- Skip SSL Verification
- Timeout (seconds)
-
Response parsing:
- File Format -
JSON - json_path
- display_json_path (optional)
- File Format -
-
Advanced HTTP Server Filters:
- regex_filter (optional)
-
Preview and finish: Click Preview Results in the Live Results panel to verify that your setup retrieves the correct values, then click Done (or Save when editing).
Most Setup fields (for example bucket_name, object_key, Path, Query, json_path, display_json_path, and regex_filter) have an Allow Overrides checkbox. Check it so that blueprints using this source may override that value; the overridable fields are listed in the Overrides column of the Input Sources table. See Using an Input Source in Blueprints.
Using an Input Source in Blueprints
Torque role: Space Developer
To use an input source in a blueprint:
- Define the Input: In your blueprint YAML, define an input with the type
input-source. - Reference the Source: Use the
source-nameattribute to reference the created input source. - Specify Dependencies (if any): Use the
depends-onandoverridesattributes to manage dynamic dependencies, such as bucket names or object keys. - Retrieve and Use Values: The blueprint will now dynamically retrieve and display the values from the specified input source when launching the environment.
Example YAML snippet (S3):
inputs:
  bucket:
    type: string

  object:
    type: input-source
    source-name: bucket-objects-source
    depends-on: bucket
    overrides:
    - bucket_name: '{{ .inputs.bucket }}'
Example YAML snippet (HTTP Server):
inputs:
  region:
    type: string

  resource:
    type: input-source
    source-name: http-server-resource-list
    depends-on: region
    overrides:
    - query: 'region={{ .inputs.region }}'
Example YAML snippet (HTTP Server with searchable input):
When searchable is set to true (HTTP Server sources), the dropdown will wait for the user to type a search term instead of loading all values upfront. Use {{ value }} in overrides to pass the search text to the HTTP source, as opposed to the {{ .inputs.<name> }} syntax used for referencing other inputs.
inputs:
  instance:
    type: input-source
    source-name: http-server-instance-list
    searchable: true
    overrides:
    - query: 'search={{ value }}'
More usage examples can be found here.
Examples & Deployment
HTTP Server Example: AWS Resource Listing Server
This example demonstrates how to list S3 buckets and RDS instances per account in AWS using a simple Flask server.
Notes:
- The example is built for demo purposes with some hard-coded values and is meant to be deployed in playground environments.
- A service account with the proper AWS role is pre-created for assuming roles in other accounts, passed in the
role_arnquery parameter to the server.
Deployment Details:
- If deployed in a namespace called
input-sources, the service FQDN is:
http://aws-input-source-service.input-sources.svc.cluster.local - Service name:
aws-input-source-service - Namespace:
input-sources - Cluster domain:
svc.cluster.local
Attached Example Files:
server.py- Simple Flask server implementation.Dockerfile- Container build file for the server.aws-input-source.yaml- Kubernetes manifest with deployment and service.aws-input-source-server.yaml- Blueprint that deploys the server.
To obtain the example files (server.py, Dockerfile, aws-input-source.yaml, aws-input-source-server.yaml), please contact your account manager.
Additional Considerations
- JIT Data: To ensure that the data is up-to-date (Real-Time Data Access), the input source values are retrieved just-in-time (JIT).
- Max Result Limit: A maximum of 1000 results can be returned to help manage performance and usability.